If you already wear glasses, you won't be worried about this kind of setup ruining your eyes
Why I Think this is Awesome
I strongly dislike doing any serious amount of typing on the go because I am much slower without a proper keyboard. Enter this "mobile keyboard workstation", usable whenever you are sitting down. Plug it into your phone and then sit your phone *on* the keyboard - and now you have a surprisingly easy-to-use and stable set-up!
Phone Requirements
First of all, ensure your phone is capable of connecting to your selected keyboard! In my case, I am connecting a USB keyboard to an Android smartphone, so I had to have an "OTG" port on the phone to allow for this. As it happens, my Samsung Galaxy S2 does have that. (And unfortunately, my newer & larger Kobo Arc tablet does not.)
Snazzy side view
The Parts I'm Using
an Android Smartphone
a USB keyboard (mine is a Case Logic; I bought it for under $5 at a local computer store)
Attach the 2 binder clips on the top left & right sides of the keyboard. Give enough space to fit your smartphone in between. Everything else will attach to these 2 clips.
Note: these clips will probably scratch your keyboard!
Hook the large elastic band around the top front "feet" of the 2 binder clips. This will be used to help secure your phone in place at the bottom.
Stick all the small elastic bands on the chopstick. My thinking is that these give some added friction to the backrest - dunno if they really work.
Secure the chopstick to the binder clips using the twist ties. This acts as the backrest for your phone.
Using the Workstation
The chopstick acts as a backrest for the phone. Flip it up for use, or bring it down for storage. Place the phone on the keyboard and secure in place using the large elastic band - that should work for gentle to moderate train rocking motions. Then connect the keyboard to the phone's OTG port and you're in business!
After the initial taste of freedom with the keyboard, you'll discover that apps may not behave as expected. For example, the up/down/left/right arrow keys don't always do what I think they will in various Google apps.
Some more Android notes
Android users may need to set up some sort of "null keyboard" input to prevent the on-screen keyboard from popping up as it normally does. If you do need it, the one I've been using is called "Null keyboard" by wParam.
Be sure to enable screen rotation on your phone, so your apps will run in landscape mode. Also, for total ease of use, try to use a launcher that supports landscape orientation too. "Nova Launcher" is the one that comes default with my current ROM (OmniROM, in case you were wondering!).
In Closing
Hope this has been helpful for those of you thinking about getting more use out of your phones. It was certainly a disappointment to find that the arrow keys do not consistently work as expected across all the apps I use. However since I can easily reach the screen to tap on things, learning how to navigate solely with the keyboard is low on my to-do list.
(High on my to-do list is to figure out how to get Dungeon Crawl Stone Soup to recognize the capital letters I try to type in!)
It lets me play games on my Android TV stick - games that only respond to touches on a touch-screen. If I lost you just now, I'll assume you don't know what an Android TV stick is, or at least, you know but use a different term for it. Either way, take a look at this picture of an Android TV stick (not mine, but same model):
Notice the complete lack of a screen to look at or touch.
Yes, yes, just a stick with an HDMI port and some USB ports. (OK, and a microSD card slot, but let's not get too detailed.)
Now you can appreciate my giddiness about Tincore.
The Basics
In a nutshell, Tincore is an app that lets you use an input device (e.g. keyboard) to emulate other kinds of inputs (e.g. touches on a touch screen) for an Android device. And it works great!
It's capable of accepting input from a number of devices including keyboards, mice and gamepads. I have only ever tried (and had the desire) to test with keyboards and mice, but I'm under the impression that it can do a lot more than I've ever used it for.
You can configure individual profiles for each app, allowing you to set up very customized layouts for the games you want to play. Right now I have several profiles saved for games such as: Hillclimb Racer, Wind-up Knight, and Dark Guardians. You can set up Tincore to automatically switch profiles to whatever is currently running in the foreground, to save yourself the hassle of switching it yourself.
How to Use It
Tincore lets you remap inputs to other input types, or to control the Tincore app itself. Tincore basically has 3 modes:
Profile editing mode, when the Tincore UI overlay is visible allowing you to set up the different key/button presses to map and change the programme settings
Active mode, when Tincore is now translating all the mappings that you've defined for the current profile
Paused mode, when a mapping profile has been activated but Tincore is not performing any of the mapping
This is an incredibly handy mode to have mapped to a key/button, for situations when you've screwed up your profile and can't stop the app because you've mapped all the important control keys to something else!
On launching Tincore, it puts an icon into the Notification Tray. Clicking on this icon will display the mapping overlay, putting you into the profile editing mode. At this point, any buttons you press on your keyboard or mouse will show up on the screen as transparent labeled shapes.
Keyboard Key Presses
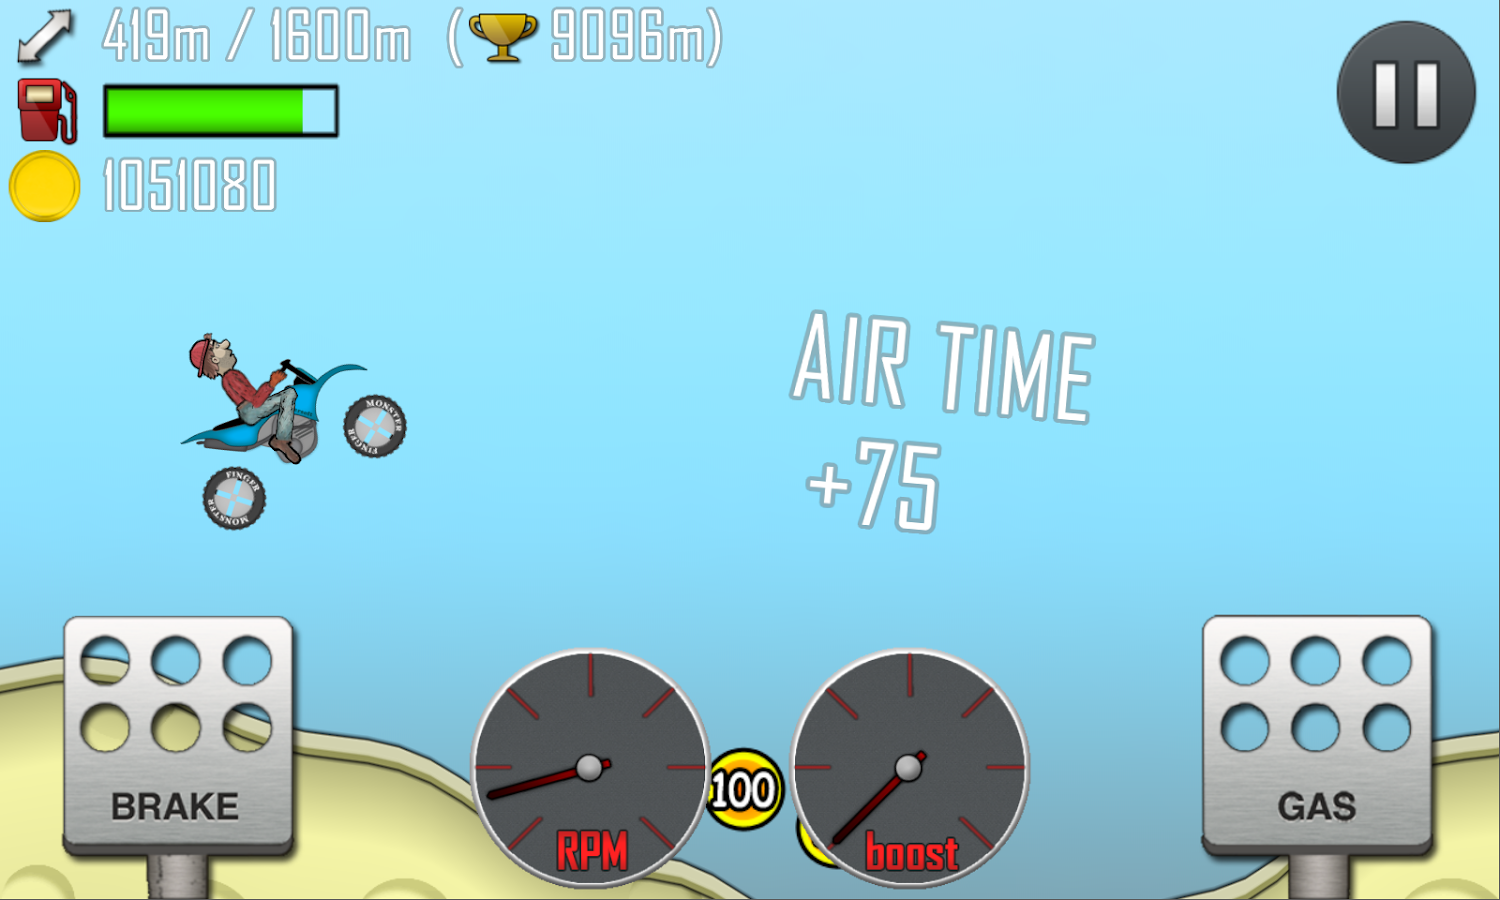
By default, keyboard key presses are mapped as simple "Touch screen" events and show up as circles. These are ideal for playing games with on-screen touch controls, such as the game shown here with the brake and gas pedals as touchable controls (on either side of the screen! This game does work with a mouse, but it is haaaard to play that way).
If you have a mouse attached, you can click and drag the circles to the points on the screen that you want to "touch" whenever that keyboard key is pressed. If you want to change what happens on pressing the key, just click on the "Touch screen" label within the UI side panel and a list of available options shows up. For example, to set up function keys F1 and F2 to toggle the UI overlay (i.e. profile editing mode) or pause the mapping (i.e. paused mode), click each key on the keyboard, then select their "Touch screen" label and change the action to "EXECUTE > MAPPER" and "EXECUTE > PAUSE".
Using the Mouse as a Touch Pointer
To have your mouse emulate your finger and create “touch events” anywhere the cursor is
positioned, do the following:
1) Set up the “Relative r0” component to: "Move hybrid pointer"
2) Set up the mouse click “m0” to: Touch hybrid pointer
Easy peasy lemon squeezy!
Drawbacks and such
The biggest point to make right now is that, AFAIK, root is required to get the most out of this app. I've read that from a number of articles, but I cannot tell you what features are root-only because my Android device was rooted long before I installed Tincore.
Besides that, here are 2 other items I have noticed:
1) My Android device can slow down big time when the UI mapping overlay is visible. Of course, it's fine for a game to run sluggish while I'm configuring it, but it certainly makes it more awkward to do.
2) I have yet to figure out how to get Tincore to emulate slight tilting, which is required to play games like Temple Run or Minion Rush. By tilting I mean when you physically tilt your Android smartphone/tablet left or right so that the character in the game shifts/leans in that direction.
Boring Monotonous Video
What's an article these days without a video link? If you have 3 minutes of your life to waste away, go ahead and click this Youtube link:
I took extra special care to speak in monotone and suck all energy and life out of my voice, just for you! This video just shows how to set up a few keyboard buttons as regular touches, and then save & activate the new profile. It also has a very blurry shot of my keyboard/air-mouse - apologies on that, next time I'll be sure to have the camera focused on the subject.
Links
If you do a search for "Tincore Keymapper", you'll find tonnes of stuff, including tutorials that are far more useful/detailed/thorough than this one.
I'll give you a headstart with some very good links:
Alright, haven't even really started and already taking things in a different direction: awesome dessert recipes! (Still fits with the theme, though)
I noticed this recipe many moons ago while flipping through a local commuter paper, but only gave it a try today. Glad I did - it was great, and easy to make too.
There's no point in me copying & pasting their recipe when I can lead you to the source: http://metronews.ca/food/940183/fall-in-love-with-a-gluten-free-chocolate-lava-cake/ (** 2014-10-21: it just occurred to me that one day the source site could be down and a reader would cry in dismay when they saw the tasty pictures and had no recipe to work with. Unfortunately, even if I wanted to stick it here I can't without the explicit permission from the publisher, so ... click the link and cross your fingers **)
... but I do have some tips for you, after my first experience baking something like this. Keep in mind I'm a complete amateur, so take these with a grain of salt:
The first step is to melt the chocolate & butter. An experienced cook would tell you to use a "double-boiler" or Bain-marie .. , what I did was lay down some chopsticks in a large pot, sit my mixing bowl on them, then fill the pot with enough water to reach the level of the chocolate & butter in the bowl. At the start, you can cover the pot to help the water heat up faster, but uncover it before all the water starts condensing and dripping onto your ingredients.
They say not to let the water boil. I completely forgot about that the second time around, and it still turned out fine
I have no idea where to get vanilla seed pods, so used artificial vanilla extract instead. No complaints from the family.
Watch that timer like a hawk. I gave my baking sheet a jiggle at the 13 minute mark and they were not done yet, but then I didn't come back till over 16 minutes past and they were too firm by then (IMO)
While the recipe says you can prep it beforehand, this does not appear to be the kind of dessert that you would want to have leftovers for. Within 15 minutes of eating our one dessert, the remaining cakes developed serious cracks on the tops, exposing the liquidy centres. I've put lids on the remaining ramekins, hoping they'll still be moist for tomorrow.
As you can see from the picture, I only baked 6 cakes - not enough ramekins! I cut the recipe in half and kept the same timing -- seems to work well
Feedback is welcome, especially if you can give me tips to improve my baking :)
Have you ever come across something and thought to yourself, "Amazing! I've got to tell someone about this!" And then you break out into song, as this fish does? https://www.youtube.com/watch?v=QXePrBbgXxg
Sometimes I feel that way. And from now on, when I do, I'll write it here (but we'll see how long that lasts). Not everything will be amazing... some will just be "neat" or "pretty cool".
I've wanted to have a spot to announce these awesome findings for a while now, so the first few posts will be the backlog of all those things that seemed amazing at the time. I'm generally keen on techie stuff, so that's probably going to be the majority of posts right there. As for the rest, we'll see
Edit: I just realized I linked to an audio-only youtube video - oops! Well, trust me, it's great. And btw, the fact that I am referencing Spongebob in my very first post is not an indication of what to expect here. Not really.